Blogging is an important part of running a successful photography business. Done right, it can help you make connections, generate business, and solidify loyalty among your clients. But…blogging is tough. If you’ve tried it before, you probably already know that it’s hard to find time to write, and even harder to make your blog posts sound good, look great, and play nice with SEO. Wouldn’t it be nice if you could just hand blogging off to someone else and let them worry about all of that?
Oh wait…you can!
RedFox Blogging provides hassle-free blogging services to support you in your journey as a photographer and business owner. If you’re thinking of hiring a ghostblogger, this post will guide you through RedFox Blogging services so you know how they work and what to expect. And of course, if you still have questions after reading, feel free to reach out! I’m happy to answer any questions you may have and help you develop the right blogging strategy for your business.
Step 1. Choose Your Package
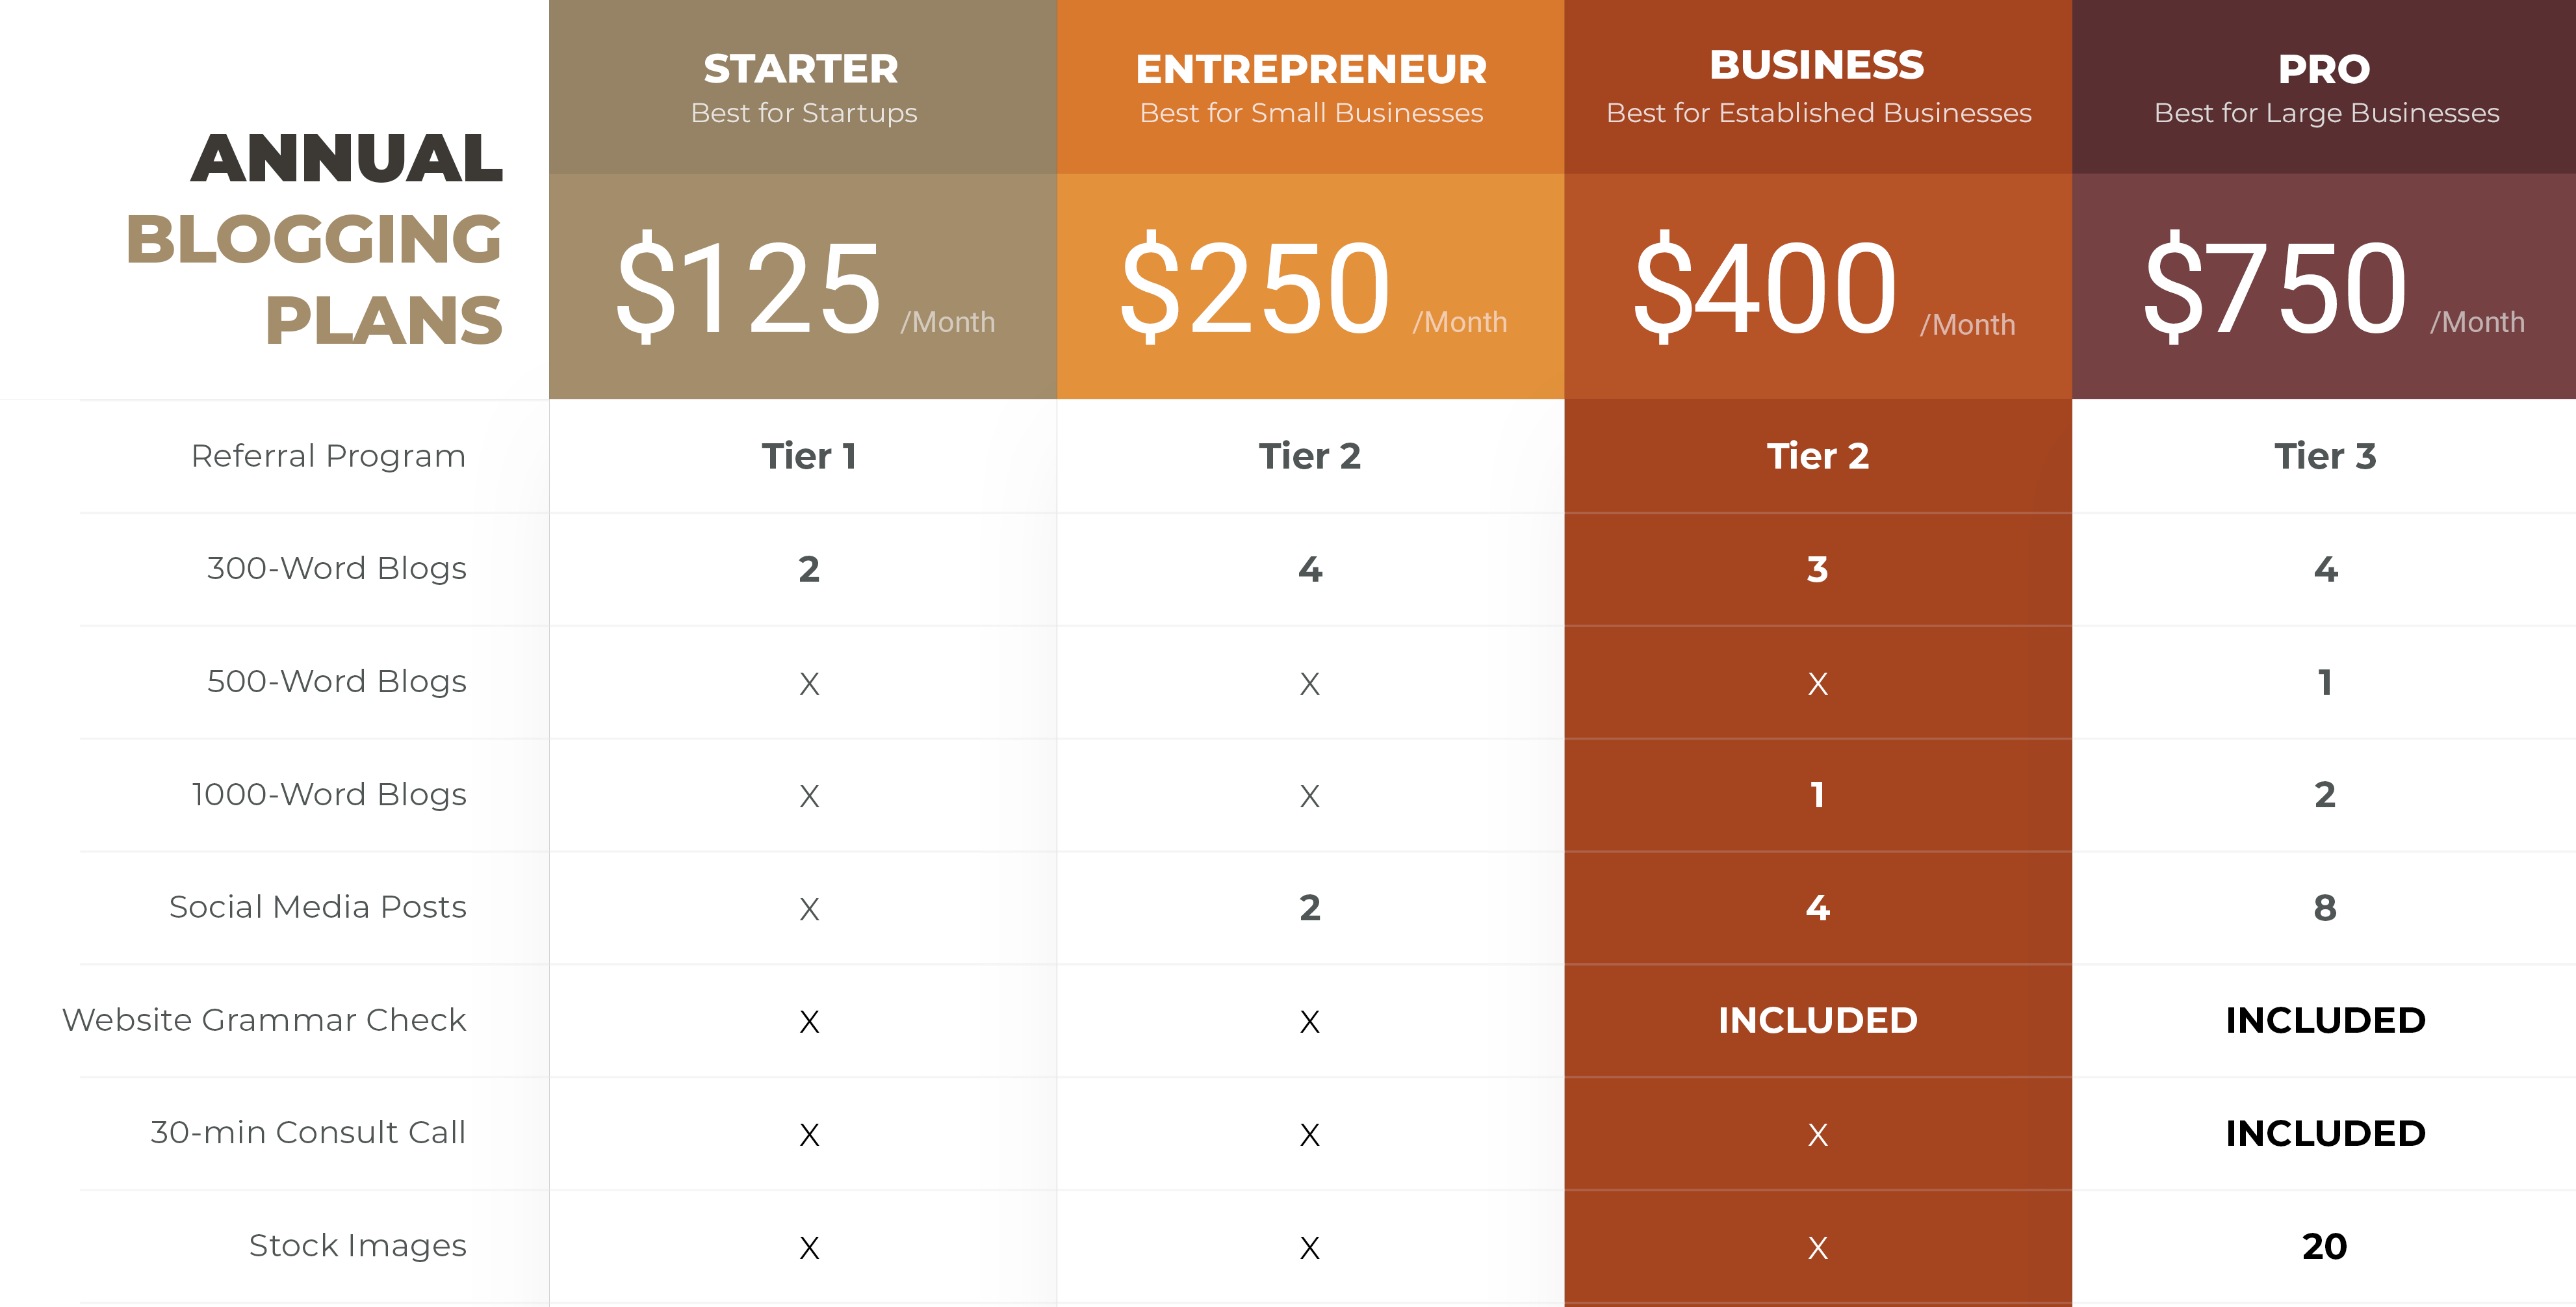
We don’t do one-size-fits-all around here. Every business is unique, and there are multiple stages of business ownership. RedFox Blogging provides a variety of packages to fit your needs and budget. I’ve outlined some of the most popular packages elsewhere on the site (see Pricing), but I’m also happy to create a custom package just for you. If you don’t see exactly the right fit among the ready-made plans, just get in touch and we’ll create a plan that’s designed specifically for you.

Step 2. Get the Nitty Gritty Out of the Way
After you’ve chosen (or designed) your package, you’ll sign your contract and submit your first payment so we can get started. You know. Deets. At this point, you can also set me up as a contributor on your site. Allowing me to post directly to your blog saves you the hassle of formatting and publishing each post. Just send me the login link to your website, along with a username and password. (I recommend setting up a separate username and password for RedFox Blogging.) Don’t worry, I keep all that stuff top secret and hush-hush.
Step 3. Start a Blog Draft
I’ll need some basic information to guide me in writing your blog post. To share this, just start a new draft on your blog with photos, a topic, and any other information you’d like me to include. You can add as much or as little information as you’d like (I’ll reach out if I need anything else), but the minimum I generally need is:
Images
Since you’re a photographer, I’m guessing you have specific images you’d like to include in your blog post. Just pop them in there! I’ll add alt text to up to 5 images, so no need to worry about that unless you have more than 5 pictures.
Basic Information
Anything you’d like me to know or include in the blog post, just jot it down in the draft. This doesn’t have to be complicated. For session posts, usually a couple of sentences will do.
Like: “We did this maternity session at Smith Park near sunset. I was a little worried about the weather but it was totally clear…just freezing! Mom did amazing though and the pics turned out great. Maybe mention the importance of dressing in layers for an outdoor session and link to last month’s what-to-wear post.”
For an informational post, depending on word count, a bit more is usually helpful, just to make sure I’m covering everything you want.
For example: “Lifestyle sessions at the studio. I have a comfy space with a bed and everything so they can get the lifestyle look without worrying about having their own house clean. Outfits are provided through the studio too so clients don’t have to stress about what to wear. Talk about how it’s so important to have genuine portraits that reflect their family’s personality and interests. My studio sessions are relaxed and focus on capturing moments. A lot of times I’ll have parents do activities (reading a book, dancing, playing patty-cake, etc.) with their kids so we can get some candid shots. Mention how the goal is for them to have artwork of these moments, and link to my page that shows off all the albums, wall art, etc.”
While pictures and some basic information is the minimum I need, you’re welcome to include more, such as which keywords you’d like me to focus on, a title (if you have one in mind), and any details you think would help your blog post shine.
Check out these posts for more on what can be helpful to include in your session or informational draft.
Step 4: Ready, Set, Go!
Once you have those materials prepped, email me that you have a blog request in the queue.
You’re also welcome to work as far ahead as you’d like. Have all your posts prepped for the next 3 months? Way to go! No need to email me for each and every post. Just tell me you’re set through August and I’ll hop on there and write up the posts on the schedule we’ve set up.
Step 5: Approve
Your blog post will be ready for your review within 5 business days. I’ll let you know as soon as it’s finished! You’ll have 3 days to look it over and request any changes. All of my posts come with one complimentary edit. I want to make sure you’re happy with the finished product! As soon as I get the okay from you, I can publish the post directly to your website.
If, after a few weeks, you feel comfortable with our workflow and don’t feel the need to approve each post individually, let me know. RedFox Blogging services is happy to manage your blog for you, making it a truly hassle-free experience.
If you’re interested in simplifying your life with personal blogging services, please contact me. I’m happy to answer any questions you may have, and to help you create a customized blogging plan for your photography business. I look forward to working with you!


